Bus Bar
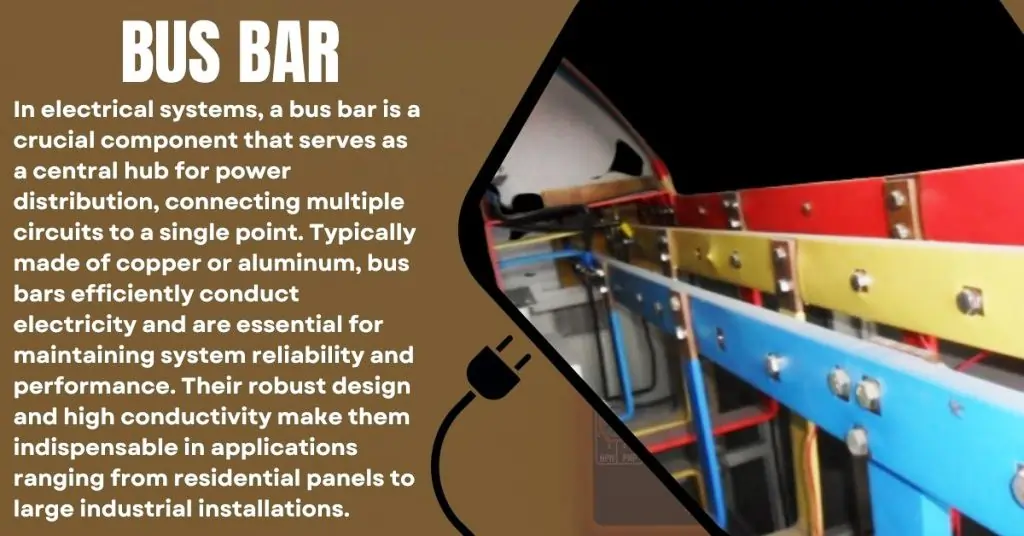
In electrical systems, a bus bar is a crucial component that serves as a central hub for power distribution, connecting multiple circuits to a single point. Typically made of copper or aluminum, bus bars efficiently conduct electricity and are essential for maintaining system reliability and performance. Their robust design and high conductivity make them indispensable in applications ranging from residential panels to large industrial installations.
Understanding the role and importance of bus bars is vital for anyone involved in electrical projects. In this guide, we will explore five essential tips for optimizing bus bar usage in your electrical systems. You’ll learn about key factors to consider when purchasing bus bars, detailed technical specifications, best practices for installation, and crucial maintenance and safety protocols. By the end of this guide, you’ll be equipped with advanced knowledge to enhance the efficiency and safety of your electrical installations.
Understanding Bus Bars
Bus bars are critical components in electrical systems, acting as central nodes for distributing electrical power. They are typically metallic strips or bars made of conductive materials like copper or aluminum, designed to carry large amounts of current. Here’s a detailed look at what bus bars are, the different types, and their roles in power distribution.
Definition and Basic Function of Bus Bars
A bus bar, often referred to simply as a bus, is a conductor that serves as a common connection point for multiple electrical circuits. It provides a neat and efficient way to distribute power from one or more incoming feeders to several outgoing feeders. Bus bars are used in various applications, including electrical panels, switchgear, and substations, to ensure the even distribution of power and maintain system stability.
Types of Bus Bars
- Copper Bus Bars: Copper bus bars are highly conductive and have excellent thermal and electrical properties. They are commonly used in high-current applications due to their ability to carry large amounts of current with minimal resistive losses. Copper bus bars are preferred in environments where high conductivity and reliability are paramount.
- Aluminum Bus Bars: Aluminum bus bars are lighter and more cost-effective than copper bus bars. While they have lower conductivity than copper, they are often used in applications where weight and cost are critical factors. Aluminum bus bars are ideal for situations where the bus bar needs to be lightweight yet still capable of carrying significant current.
Role in Power Distribution and Electrical Systems
Bus bars play a vital role in the efficient distribution of electrical power. Their primary functions include:
- Centralized Power Distribution: Bus bars provide a centralized point for power distribution, simplifying the layout and reducing the complexity of electrical systems. This centralization allows for more straightforward connections and disconnections, facilitating maintenance and expansion.
- Current Distribution: By offering a low-resistance path, bus bars ensure that current is evenly distributed across multiple circuits. This uniform distribution minimizes voltage drops and power losses, improving the overall efficiency of the electrical system.
- System Flexibility: Bus bars enhance the flexibility of electrical systems by allowing easy addition or removal of circuits. This adaptability is crucial in environments where electrical demands frequently change, such as industrial plants or data centers.
- Safety and Reliability: Properly designed and installed bus bars contribute to the safety and reliability of electrical systems. They reduce the risk of overheating and electrical faults by providing robust and efficient pathways for current flow.
Bus Bar Size Calculations: A Detailed Guide
Calculating the appropriate size for a bus bar is crucial for ensuring the efficiency, safety, and reliability of electrical systems. Here is a step-by-step guide to help you determine the right bus bar size for your needs:
1. Understand the Current Load
The first step in calculating bus bars size is understanding the current load it needs to carry. This involves determining the maximum current that will flow through the bus bar during peak operation.

2. Select the Bus Bars Material
Bus bars are typically made from copper or aluminum, each with different current carrying capacities. Copper has higher conductivity and is often preferred, but aluminum is lighter and less expensive.
Common Conductivities:
- Copper: 0.601 ohm-meter
- Aluminum: 0.377 ohm-meter
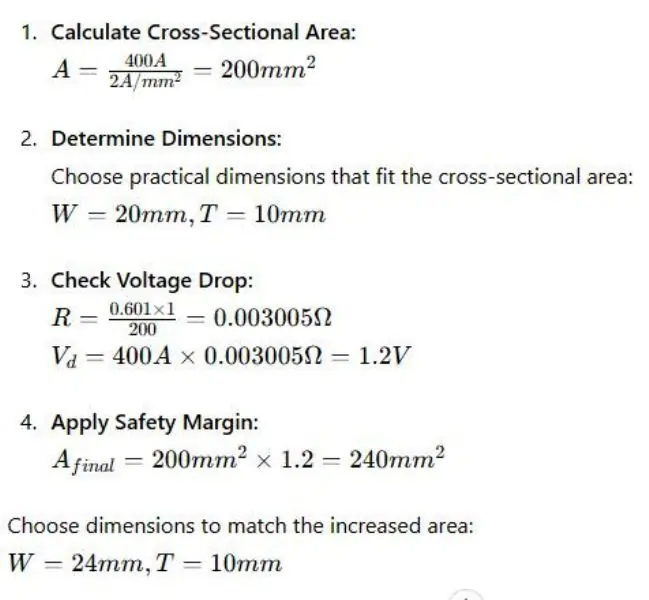
3. Determine the Cross-Sectional Area
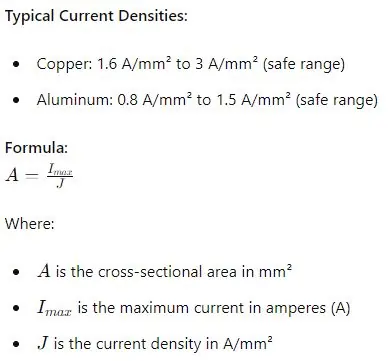
The cross-sectional area of the bus bars is calculated based on the current load and the material’s current density. The current density (J) is the amount of current per unit area and varies depending on the material and operating conditions.
4. Calculate the Dimensions
Once you have the required cross-sectional area, you can determine the bus bar’s dimensions. Bus bars are usually rectangular, so you need to decide on the width (W) and thickness (T).
Formula: A=W×T
Where:
- W is the width in mm
- T is the thickness in mm
5. Verify Thermal and Mechanical Considerations
Ensure the bus bars can handle the thermal rise due to current flow and mechanical stresses. This includes checking the temperature rise, expansion due to heat, and ensuring the material’s mechanical strength is sufficient.
Thermal Considerations:
- Allowable temperature rise (typically 30-50°C above ambient)
Mechanical Considerations:
- Mechanical strength to withstand forces during short circuits and thermal expansion
6. Check for Voltage Drop
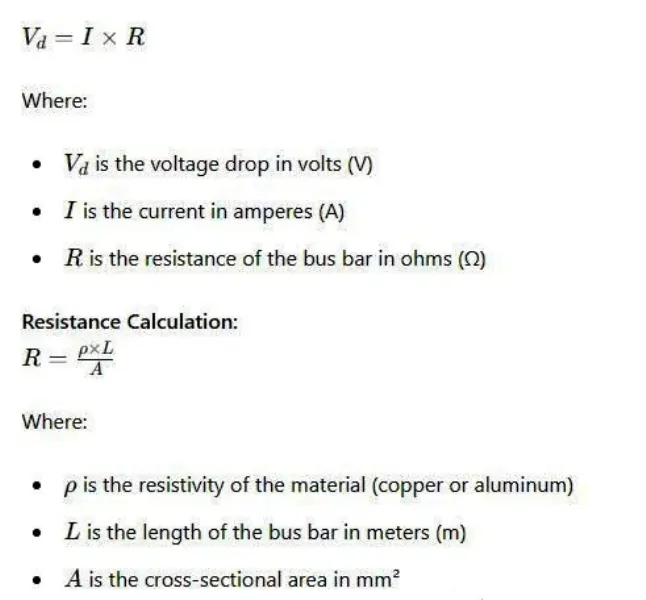
Ensure the voltage drop across the bus bar is within acceptable limits. Excessive voltage drop can lead to inefficiencies and potential operational issues.
Formula:
7. Safety Margin
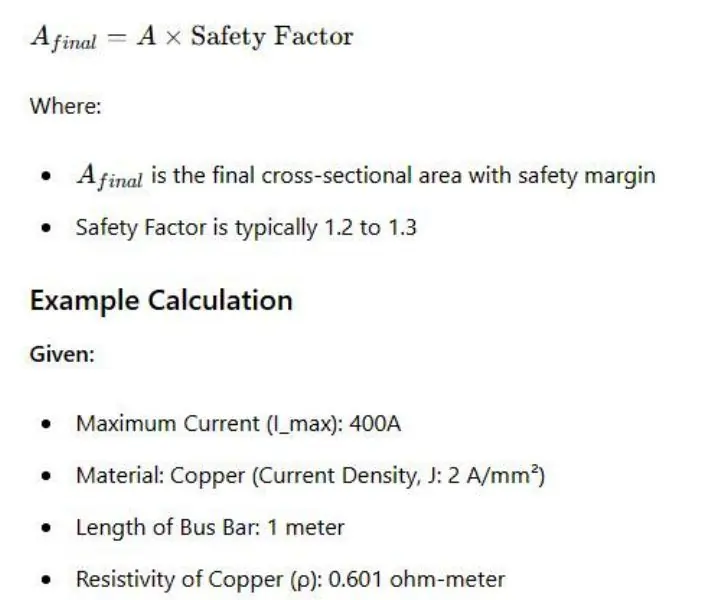
Always include a safety margin in your calculations to account for unexpected increases in load or variations in operating conditions. A common practice is to design for 20-30% above the maximum calculated current load.
Final Consideration:
Steps
Tips for Purchasing Bus Bars
| Consideration | Details |
|---|---|
| Factors to Consider When Buying Bus Bars | |
| Material | Copper: Superior conductivity and durability. Aluminum: Lightweight and cost-effective. |
| Size | Ensure dimensions (width, thickness, length) match system requirements. Proper sizing ensures adequate current-carrying capacity and minimizes resistive losses. |
| Current Capacity | Calculate peak load to choose a bus bar with sufficient ampacity. Prevents overheating and ensures safety. |
| Comparison of Different Bus Bar Materials | |
| Copper Bus Bars | Pros: Excellent electrical conductivity, high thermal conductivity, superior mechanical strength, corrosion resistance. Cons: Higher cost, heavier weight. |
| Aluminum Bus Bars | Pros: Lightweight, more affordable, sufficient conductivity for many applications. Cons: Lower conductivity than copper, more prone to oxidation, requires larger cross-sectional area for the same current capacity. |
| Trusted Suppliers and Manufacturers | |
| Siemens | Known for high-quality electrical components, including bus bars. |
| Schneider Electric | Offers a wide range of electrical distribution products. |
| ABB | A global leader in power and automation technologies, providing reliable bus bar solutions. |
| Eaton | Known for innovative electrical systems and components. |
| Cost Considerations and Budget Tips | |
| Material Costs | Copper is generally more expensive than aluminum, but may be justified for high conductivity and durability applications. |
| Sizing for Efficiency | Properly size bus bars to avoid overspending on unnecessary capacity; accurate calculations based on system requirements can help optimize costs. |
| Bulk Purchases | Buying in bulk can reduce per-unit costs; coordinate with suppliers for bulk pricing, especially for large projects. |
| Second-Hand Options | Consider purchasing second-hand bus bars from reputable sources for non-critical applications to save costs, ensuring they meet safety and performance standards |
Technical Specifications and Standards
| Consideration | Details |
|---|---|
| Key Specifications to Look For | |
| Ampacity | The maximum current a bus bar can carry without exceeding its temperature limit. Ensure the bus bar has sufficient ampacity for your system’s load requirements. |
| Voltage Rating | The maximum voltage a bus bar can handle. Choose a bus bar with a voltage rating appropriate for your application to prevent insulation breakdown and ensure safety. |
| Thermal Performance | The ability of a bus bar to dissipate heat generated by electrical currents. Good thermal performance prevents overheating and maintains system reliability. |
| Industry Standards and Certifications | |
| IEC (International Electrotechnical Commission) | Sets international standards for electrical, electronic, and related technologies. Ensures global compatibility and safety of electrical products. |
| ANSI (American National Standards Institute) | Develops standards for products, services, processes, and systems in the United States. Ensures products meet performance and safety criteria specific to the US market. |
| UL (Underwriters Laboratories) | Provides safety-related certification, validation, testing, inspection, auditing, advising, and training services. Ensures products meet safety standards to protect consumers. |
| How to Read and Understand Bus Bar Datasheets | |
| Manufacturer Information | Includes manufacturer’s name, product code, and series. Important for identifying the specific bus bar and sourcing replacement parts. |
| Electrical Specifications | Lists ampacity, voltage rating, resistance, and other key electrical properties. Compare these specifications with your system requirements to ensure compatibility. |
| Mechanical Specifications | Includes dimensions, weight, and material composition. Verify these specs to ensure the bus bar fits physically and meets mechanical strength requirements. |
| Thermal Characteristics | Indicates operating temperature range and thermal conductivity. Essential for understanding the thermal performance and ensuring safe operation under load conditions. |
| Importance of Compliance with Technical Standards | |
| Safety | Compliance ensures that bus bars meet rigorous safety standards, reducing the risk of electrical hazards. |
| Performance | Adhering to standards guarantees that bus bars perform reliably under specified conditions, ensuring system efficiency. |
| Legal and Regulatory Requirements | Meeting industry standards and certifications is often a legal requirement for commercial and industrial electrical installations. |
| Market Acceptance | Products that comply with recognized standards are more readily accepted in the market, enhancing trust and reliability among users and clients. |
Installation and Usage Guidelines
Installing bus bars correctly is essential for ensuring the efficiency, safety, and reliability of your electrical systems. Here’s a comprehensive guide covering the installation process, best practices, common mistakes to avoid, and tips for optimizing performance.
Step-by-Step Guide to Installing Bus Bars
- Preparation
- Safety First: Ensure the power is turned off and lockout/tagout procedures are in place.
- Gather Tools and Materials: Assemble all necessary tools, including wrenches, screwdrivers, insulation materials, and personal protective equipment (PPE).
- Review Specifications: Verify the bus bar specifications, including size, ampacity, and voltage rating, to ensure they match your system requirements.
- Mounting the Bus Bar
- Positioning: Position the bus bar in its designated place within the electrical panel or enclosure, ensuring it is level and properly aligned.
- Securing: Use appropriate hardware to secure the bus bar to its mounts or brackets, tightening bolts to the manufacturer’s recommended torque specifications.
- Connecting Conductors
- Strip Insulation: Carefully strip the insulation from the ends of the conductors that will be connected to the bus bar.
- Attach Conductors: Attach the conductors to the bus bar using appropriate lugs or clamps, ensuring a tight and secure connection to prevent arcing and overheating.
- Insulation and Protection
- Insulate Exposed Parts: Apply insulation to any exposed parts of the bus bar to prevent accidental contact and short circuits.
- Install Barriers: Use insulating barriers or covers to protect the bus bar from dust, moisture, and accidental contact.
- Testing and Inspection
- Conduct Tests: Perform continuity and insulation resistance tests to verify proper installation.
- Visual Inspection: Check for any signs of loose connections, improper alignment, or insulation damage.
Best Practices for Ensuring Efficient and Safe Installation
- Follow Manufacturer Guidelines: Always adhere to the manufacturer’s installation instructions and specifications.
- Use Proper Tools: Utilize the correct tools and torque settings to avoid damaging the bus bar or connections.
- Maintain Cleanliness: Keep the installation area clean and free of debris to prevent contamination and ensure good electrical contact.
- Ensure Proper Ventilation: Provide adequate ventilation around the bus bar to dissipate heat and prevent overheating.
Common Installation Mistakes and How to Avoid Them
- Incorrect Sizing: Ensure the bus bar size matches the system’s current and voltage requirements to avoid overheating and inefficiencies.
- Loose Connections: Tighten all connections securely to prevent arcing and potential fire hazards.
- Inadequate Insulation: Properly insulate all exposed parts to prevent accidental contact and short circuits.
- Ignoring Manufacturer Instructions: Always follow the manufacturer’s guidelines to ensure compatibility and safety.
Tips for Optimizing Bus Bar Performance in Electrical Systems
- Regular Maintenance: Schedule regular inspections and maintenance to identify and address wear, corrosion, and loose connections.
- Monitor Load Conditions: Continuously monitor the load on the bus bar to ensure it does not exceed its rated capacity.
- Temperature Control: Implement temperature monitoring and control measures to prevent overheating and thermal degradation.
- Quality Materials: Use high-quality materials and components to ensure long-term reliability and performance.
Maintenance and Safety Considerations
Proper maintenance and adherence to safety protocols are crucial for the longevity and safe operation of bus bars in electrical systems. Below are guidelines for regular maintenance practices, troubleshooting common issues, implementing safety protocols, and the importance of inspections and timely repairs.
Regular Maintenance Practices for Bus Bars
- Visual Inspections
- Frequency: Conduct visual inspections regularly, at least quarterly.
- What to Look For: Check for signs of discoloration, corrosion, loose connections, and physical damage.
- Action: Address any visible issues immediately to prevent further damage.
- Thermal Imaging
- Frequency: Perform thermal imaging inspections annually.
- Purpose: Identify hotspots that indicate potential overloading or poor connections.
- Action: Correct any issues revealed by thermal imaging to prevent overheating and failure.
- Cleaning
- Frequency: Clean bus bars and surrounding areas every six months.
- Method: Use appropriate cleaning agents and tools to remove dust, dirt, and debris.
- Action: Ensure the bus bar surfaces and connections are clean to maintain good electrical contact.
- Tightening Connections
- Frequency: Check and tighten connections annually.
- Method: Use torque wrenches to tighten connections to manufacturer specifications.
- Action: Prevent loose connections that could lead to arcing and overheating.
Troubleshooting Common Bus Bar Issues
- Overheating
- Symptoms: Discoloration, insulation damage, or smell of burning.
- Causes: Overloading, loose connections, or inadequate ventilation.
- Solutions: Reduce load, tighten connections, and improve ventilation.
- Corrosion
- Symptoms: Rust or oxidation on bus bar surfaces.
- Causes: Exposure to moisture or corrosive environments.
- Solutions: Clean affected areas, apply anti-corrosion coatings, and ensure proper enclosure sealing.
- Voltage Drops
- Symptoms: Reduced voltage levels at the load end.
- Causes: High resistance due to loose connections or inadequate bus bar size.
- Solutions: Tighten connections, replace undersized bus bars, and ensure proper sizing during design.
- Arcing
- Symptoms: Visible sparks or electrical noise.
- Causes: Loose or damaged connections.
- Solutions: Secure and repair connections, replace damaged components.
Safety Protocols and Protective Measures
- Personal Protective Equipment (PPE)
- Requirement: Always wear appropriate PPE, including gloves, safety glasses, and insulating footwear.
- Purpose: Protect against electrical shocks, burns, and other injuries.
- Lockout/Tagout (LOTO)
- Procedure: Implement LOTO procedures before performing any maintenance work.
- Purpose: Ensure that the electrical system is de-energized and cannot be accidentally re-energized.
- Insulation Barriers
- Implementation: Use insulation barriers and covers to protect exposed bus bars.
- Purpose: Prevent accidental contact and reduce the risk of short circuits.
- Signage and Labels
- Requirement: Clearly label all bus bars and electrical panels with appropriate warning signs.
- Purpose: Inform personnel of potential hazards and ensure awareness of high-voltage areas.
Importance of Regular Inspections and Timely Repairs
- Preventive Maintenance
- Benefit: Regular inspections help identify and address issues before they lead to significant failures.
- Outcome: Reduced downtime and extended lifespan of bus bars.
- Timely Repairs
- Requirement: Address any identified issues promptly to prevent escalation.
- Outcome: Improved safety and reliability of the electrical system.
- Compliance
- Necessity: Adhering to maintenance schedules ensures compliance with industry standards and regulations.
- Result: Avoidance of legal penalties and enhanced operational safety.
FAQ on “Bus Bar”
Q: What is a bus bar used for?
A: Distributing electrical power within a system.
Q: What materials are commonly used for bus bars?
A: Copper and aluminum.
Q: How do you determine the size of a bus bar needed?
A: By the current load, voltage rating, and material.
Q: What maintenance is required for bus bars?
A: Visual inspections, cleaning, and tightening connections.
Conclusion
In conclusion, bus bars are essential components in electrical systems, providing efficient power distribution and ensuring safety and reliability. By understanding their functions, selecting the right materials and sizes, following proper installation guidelines, and adhering to regular maintenance practices, you can optimize the performance of your electrical systems. Keep these tips in mind to ensure your bus bars serve their purpose effectively, maintaining a safe and efficient electrical environment. For further insights and tips, continue exploring our blog and stay updated with the latest in electrical system management.
